


OAuth
Say you are using a website to do some work for you. In order to complete the work, the website needs to access some resources you have in other website(e.g., your tweets on twitter). How will you give the website the resources? You certainly shouldn't give him your twitter username/password. Because in that way, you can't be sure what the website would do with your twitter account. This is the problem OAuth trying to solve.
Before we get to the details of oauth process, we should know that there are four types of grant type for oauth authorization, each is used for specific scenarios.
- Authorization Code Grant: used to obtain both access tokens and refresh tokens and is optimized for confidential clients.
- Implicit Grant: used to obtain access tokens and is optimized for public clients known to operate a particular redirection URI.
- Resource Owner Password Credentials Grant: suitable in cases where the resource owner has a trust relationship with the client.
- Client Credentials Grant: can request an access token using only its client credentials.
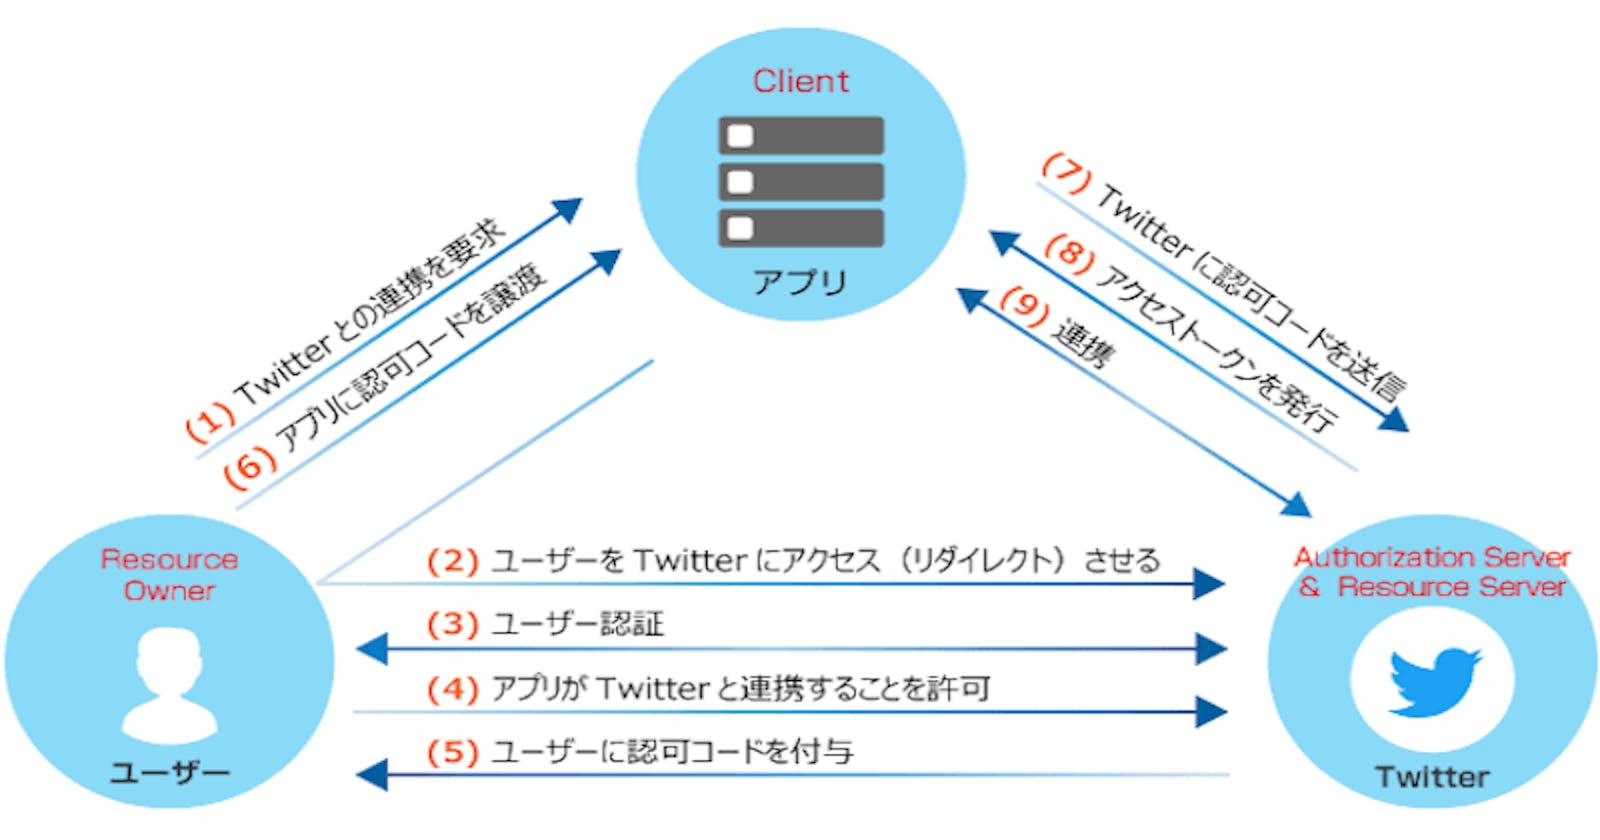
The Authorization Code grant type is the most commonly used OAuth 2.0 grant type. Let's see how it works.
Firstly, the website you are using will redirect current page to the resources page(in above example, redirect to twitter login page). The page will ask for your credentials and certain resources. Then, you input your twitter credentials, authorize, then twitter will redirect back with an authorization code. This process is called authorization request. The website could use this code, send it to twitter and get an access_code. This process is called access request. Lastly, the website could use this access_token, request certain resources from twitter.
As you can see, in this process, you only input your credentials to twitter. The website only gets an access code for certain requested resources. You twitter account is safe, everyone is happy.
This access code has short expire time for safety reason. When it expires, you don't want to go through the above process again, so there is a code called refresh token to solve this problem. The website should get this refresh token with the access token at the same time. Refresh token has a longer expire time and the website could use it to get a new access token.
OpenID Connect
From the OAuth process, we can see that it is only designed for authorization. It is used for granting access to data and features from one application to another. In OAuth, the website you are using only get an access token to access certain resources, and they don't know anything about you. So OAuth can't be used for authentication.
OpenID Connect is an extension of OAuth. It is a thin layer above OAuth which adds support for authentication. Let's see the details.
For authorization code flow, the only change is that the website add a value openid to the scope parameter in the authrization code request. And after that, when the website receives the access token, they should receive a id token as well. This id token contains the information about you in JWT format. So the website could verify this id token to complete authentication.
Proof Key for Code Exchange
In the above authorization code grant flow, after you input your credentials, twitter will redirect back authorization code to the website. This process could be susceptible to the authorization code interception attack. In this attack, the attacker intercepts the authorization code within a communication path not protected by Transport Layer Security (TLS), such as inter-application communication within the client's operating system.
To defend from this attack, the proof key for code exchange is invented. The flow goes like below.
                                                 +-------------------+
                                                 |   Authz Server    |
       +--------+                                | +---------------+ |
       |        |--(A)- Authorization Request ---->|               | |
       |        |       + t(code_verifier), t_m  | | Authorization | |
       |        |                                | |    Endpoint   | |
       |        |<-(B)---- Authorization Code -----|               | |
       |        |                                | +---------------+ |
       | Client |                                |                   |
       |        |                                | +---------------+ |
       |        |--(C)-- Access Token Request ---->|               | |
       |        |          + code_verifier       | |    Token      | |
       |        |                                | |   Endpoint    | |
       |        |<-(D)------ Access Token ---------|               | |
       +--------+                                | +---------------+ |
                                                 +-------------------+
In words, the website should generate a random string as a code_verifier. Then generate a code_challenge from code_verifier through BASE64URL-ENCODE(SHA256(ASCII(code_verifier))). Then, the website send this code_challenge in the authorization request and the code_verifier in the access request. that's all.
Code Example With Azure AD
Now we know all the pieces, let's write an spa code example in react to access Azure AD.
import { useEffect, useState } from 'react';
import './App.css';

// can be found in azure ad portal
const tenantId = "xxx";
const clientId = "yyy";

// can be found in azure portal
const authorizationEndpoint = `https://login.microsoftonline.com/${tenantId}/oauth2/v2.0/authorize`;
const tokenEndpoint = `https://login.microsoftonline.com/${tenantId}/oauth2/v2.0/token`;
const graphEndpoint = "https://graph.microsoft.com/v1.0/me";

// I generate a example verifier and challenge first
// should be generate dynamically
// refer to this blog to see how to generate them in js: https://www.valentinog.com/blog/challenge/
const codeVerifier = "ThisIsntRandomButItNeedsToBe43CharactersLong";
const codeChallenge = "ocYCWfMwcSjWZok91g7EAZsKLdqPI7Nn_qoUWIdHHM4";

const redirectUri = "http://localhost:3001";

// random string
const state = "123456";

// openid for openid connect
const scope = "user.read profile openid email";

function App() {

    const [accessToken, setAccessToken] = useState("");
    const [refreshToken, setRefreshToken] = useState("");
    const [idToken, setIdToken] = useState("");

    // used to get authorization code
    const authorizeRequest = () => {
        const params = new URLSearchParams({
            client_id: clientId,
            redirect_uri: redirectUri,
            code_challenge: codeChallenge,
            code_challenge_method: "S256",
            response_type: "code",
            scope,
            state,
        });
        location.href = authorizationEndpoint + "?" + params.toString();
    };

    // monitor url, if there is code and state parameters and state is right
    // then run the access request
    useEffect(() => {
        const url = new URL(location.href);
        if (!url.searchParams.has("code")) return;
        if (!url.searchParams.has("state")) return;
        if (url.searchParams.get("state") !== state) return;
        const params = new URLSearchParams({
            client_id: clientId,
            code: url.searchParams.get("code"),
            redirect_uri: redirectUri,
            code_verifier: codeVerifier,
            grant_type: "authorization_code",
            scope,
        });

        // used to get access/refresh/id token
        fetch(tokenEndpoint, {
            method: "POST",
            headers: {
                Accept: "application/json",
                "content-type": "application/x-www-form-urlencoded",
            },
            body: params
        })
            .then(res => res.json())
            .then(res => {
                setAccessToken(res.access_token);
                setRefreshToken(res.refresh_token);
                setIdToken(res.id_token);
            })
            .catch(e => {
                console.error(e);
            });
    }, []);

    const resourcesRequest = () => {
        fetch(graphEndpoint, {
            headers: {
                "Authorization": `Bearer ${accessToken}`
            }
        })
            .then(res => res.json())
            .then(res => {
                console.log(res);
            });
    };

    // use access token to request user information in azure
    const refreshTokenRequest = () => {
        const params = new URLSearchParams({
            client_id: clientId,
            grant_type: "refresh_token",
            refresh_token: refreshToken,
            scope,
        });

        fetch(tokenEndpoint, {
            method: "POST",
            headers: {
                Accept: "application/json",
                "content-type": "application/x-www-form-urlencoded",
            },
            body: params
        })
            .then(res => res.json())
            .then(res => {
                setAccessToken(res.access_token);
                setRefreshToken(res.refresh_token);
                setIdToken(res.id_token);
            })
            .catch(e => {
                console.error(e);
            });

    };

    // monitor to see token change
    useEffect(() => {
        console.log({ accessToken });
    }, [accessToken]);
    useEffect(() => {
        console.log({ refreshToken });
    }, [refreshToken]);
    useEffect(() => {
        console.log({ idToken });
    }, [idToken]);

    return (
        <div className="App">
            <div>
                <button onClick={authorizeRequest}>authorizeRequest</button>
                <button onClick={resourcesRequest}>resourcesRequest</button>
                <button onClick={refreshTokenRequest}>refreshTokenRequest</button>
            </div>
        </div>
    );
}

export default App;
Before running the code, make sure you have configure azure ad properly(refer to this doc). Specific paramters can be refered in this doc.